
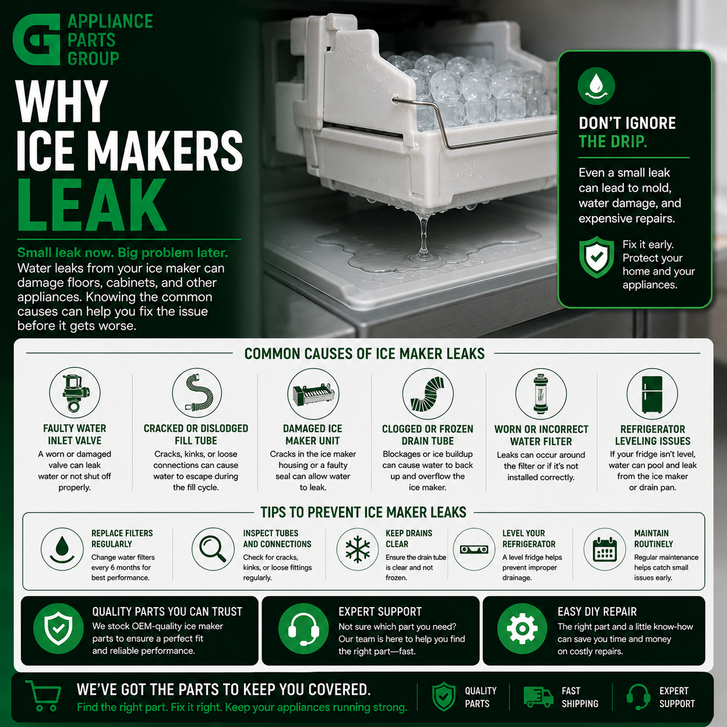
Key Takeaways
- Ice maker leaks commonly come from a frozen or misaligned fill tube, a damaged water line, or a faulty water inlet valve.
- Water may appear to come from the ice maker even when the actual leak begins behind or underneath the refrigerator.
- Ice buildup, hollow cubes, oversized cubes, and water in the ice bin can help identify where the problem is occurring.
- Many basic inspections can be completed by a homeowner, but electrical, sealed-system, and difficult plumbing repairs may require a qualified technician.
- Using the refrigerator model number is the most reliable way to identify a compatible OEM replacement part.
Introduction
A leaking ice maker can cause more than a wet ice bin. Water may freeze into large clumps, drip onto food, collect beneath refrigerator drawers, damage flooring, or create a recurring sheet of ice along the bottom of the freezer.
The source is not always obvious. A puddle under the refrigerator may begin at the household water connection, while water inside the freezer may come from the ice maker fill tube, water inlet valve, ice mold, or an installation problem. In some cases, a blocked defrost drain creates water near the ice maker even though the ice-making system is working normally.
Finding the cause starts with identifying when and where the water appears. Does the leak occur only when the ice maker fills? Is there water inside the ice bin? Are cubes unusually large, hollow, or fused together? Is ice forming around the fill tube? These details can narrow the problem before any parts are removed.
This guide explains why ice makers leak, how to inspect the most common trouble areas, which replacement parts may be involved, and how routine maintenance can help prevent future water damage.
How a Refrigerator Ice Maker Receives Water
Most automatic refrigerator ice makers use a controlled water-fill system. A household supply line delivers water to the refrigerator. When the ice maker calls for water, an electrically operated water inlet valve opens for a short period. Water then travels through an internal tube and enters the ice maker mold through a fill tube near the back of the freezer.
The water freezes in the mold. Once the cubes are ready, the ice maker ejects them into the storage bin and begins another cycle when additional ice is needed.
A leak can develop anywhere along this route:
- At the household shutoff valve or supply-line connection
- Along the refrigerator water line
- At the water inlet valve
- Inside the cabinet tubing
- At the freezer fill tube
- Inside the ice maker assembly
- Around the ice storage bin or dispenser chute
Because water can travel along tubing, wiring, cabinet panels, and flooring before it becomes visible, the wettest area is not always the original source.
Common Reasons Ice Makers Leak
1. The Ice Maker Fill Tube Is Frozen
The fill tube directs water into the ice maker mold. If moisture freezes inside the tube, the next fill cycle may be partially or completely blocked. Incoming water can spray backward, overflow around the tube, or run down the freezer wall instead of entering the mold.
A frozen fill tube may be associated with:
- Low household water pressure
- A water inlet valve that does not close completely
- Mineral deposits restricting water flow
- A fill tube that is not fully inserted
- Freezer temperatures that are set unusually low
Visible ice around the rear of the ice maker or a frozen stream extending from the fill tube is a strong indication of this problem. Removing the ice without correcting the underlying cause may provide only a temporary solution.
2. The Fill Tube Is Misaligned
The fill tube must direct water into the correct area of the ice mold or fill cup. If the tube shifts, becomes loose, or was not positioned correctly during installation, some of the water may miss the ice maker.
This can produce water on top of the ice bin, ice along the freezer wall, or frozen droplets beneath the ice maker. Misalignment may occur after the ice maker has been replaced, moved, or removed for cleaning.
The tube should sit securely in its intended opening without being crushed, sharply bent, or positioned against the edge of the fill cup.
3. The Water Inlet Valve Is Not Closing Properly
The water inlet valve opens when it receives an electrical signal from the ice maker or water dispenser. When the fill period ends, the valve should close and stop the flow completely.
A worn, contaminated, or mechanically damaged valve may allow water to seep through after the fill cycle. Even a slow drip can eventually overfill the ice mold or freeze inside the fill tube.
Possible symptoms of an inlet-valve problem include:
- Oversized ice cubes
- Cubes fused into a solid sheet
- Water collecting in the ice bin
- A fill tube that repeatedly freezes
- Dripping that continues when the ice maker is turned off
- Water appearing after each fill cycle
A valve can also behave incorrectly when household water pressure is below the refrigerator manufacturer’s required range. Insufficient pressure may prevent the valve diaphragm from closing correctly. For that reason, the supply pressure and tubing should be checked before assuming the valve itself has failed.
4. The Refrigerator Water Line Is Loose or Damaged
A refrigerator may use plastic, braided, or metal tubing between the household water supply and the appliance. Connections can loosen, tubing can crack, and plastic lines may become brittle over time.
Leaks often develop at:
- The household shutoff valve
- The connection at the rear water inlet valve
- A compression fitting
- A push-to-connect fitting
- A section of tubing rubbing against the cabinet or wall
A supply-line leak usually creates water behind or beneath the refrigerator rather than inside the ice bin. However, water can travel underneath the cabinet and appear at the front, making the source difficult to identify.
Any damaged line should be replaced with tubing approved for refrigerator water service. Connections should be installed according to the appliance and tubing manufacturer’s instructions.
5. An Internal Water Tube Is Cracked
Refrigerators with an ice maker and water dispenser may contain several internal water tubes. These tubes can split, pull out of a connector, or develop pinhole leaks.
Depending on the location of the damage, water may appear:
- Under the refrigerator
- Behind a lower access panel
- Inside the fresh-food compartment
- Near the freezer door hinge
- Around the ice maker fill area
Some tubing is accessible after removing a service panel, while other sections are routed through the cabinet or freezer door. Difficult-to-access tubing may require professional service.
6. The Ice Maker Mold or Assembly Is Damaged
The ice maker mold holds water while it freezes. A cracked mold, damaged coating, distorted fill cup, loose component, or failed seal may allow water to escape before freezing is complete.
On many models, the mold is part of the complete ice maker assembly rather than a separately serviceable component. If the assembly is cracked or mechanically worn, replacement may be more practical than attempting to repair an individual section.
Water directly beneath the mold, especially when the fill tube and inlet valve appear to be operating correctly, may indicate an assembly problem.
7. The Refrigerator Is Not Level
A refrigerator that leans too far forward, backward, or sideways can affect how water enters and sits in the ice mold. If the appliance is significantly out of level, water may spill over the edge before it freezes.
Leveling also affects door closure and drainage. A door that does not seal correctly allows warm, humid air into the freezer, which can contribute to frost, melting, and refreezing around the ice maker.
Check the refrigerator with a level and adjust the leveling legs or rollers according to the owner’s manual. The manufacturer may specify a slight backward tilt to help the doors close properly.
8. The Ice Maker Is Overfilling
Overfilling occurs when too much water enters the mold during a cycle. The excess may spill into the bin and freeze around finished cubes.
Potential causes include:
- A water inlet valve that sticks open
- An incorrect fill-time adjustment
- A control-board or ice maker module problem
- Incorrect replacement parts
- Improper water pressure
Some older ice makers have a limited fill adjustment, but changes should not be made unless the manufacturer’s service information provides the correct procedure. Increasing or decreasing fill time without diagnosing the cause may create undersized cubes or conceal a failing valve.
9. Ice Is Melting and Refreezing
Not every apparent ice maker leak is caused by incoming water. Ice can melt when the freezer is too warm, the door is left open, the gasket leaks, or airflow is restricted. Meltwater may collect in the bin and later refreeze into a solid block.
Check for:
- Soft or wet ice cubes
- Heavy frost around the freezer door
- A torn, dirty, or distorted door gasket
- Food packages preventing the door from closing
- Blocked freezer air vents
- Temperature fluctuations
A refrigerator thermometer can help confirm whether the freezer is maintaining an appropriate temperature. Follow the manufacturer’s recommended setting for the specific appliance.
10. A Blocked Defrost Drain Is Being Mistaken for an Ice Maker Leak
During an automatic defrost cycle, frost melts from the evaporator and flows through a drain. If the drain freezes or becomes obstructed, water can collect beneath the freezer floor or flow into another part of the cabinet.
This problem may create a sheet of ice on the freezer floor, water beneath the crisper drawers, or a puddle under the refrigerator. Because the water appears near the ice maker, the ice maker may be blamed even though the defrost drainage system is responsible.
Clearing a defrost drain may require access to cold, sharp, or electrically connected components. Follow the service information for the model and contact a qualified technician when safe access is uncertain.
11. The Water Filter Is Incorrectly Installed or Restricted
On refrigerators that route ice maker water through a filter, a filter problem can affect water pressure and flow. An incorrectly seated filter, damaged filter housing, clogged cartridge, or incompatible filter may contribute to leaks or irregular filling.
Inspect the filter area for moisture and confirm that the cartridge is installed in the correct orientation. Replace the filter according to the refrigerator manufacturer’s schedule and installation instructions.
12. The Ice Bin or Dispenser Area Is Creating Condensation
Refrigerators with through-the-door ice dispensers can develop condensation when warm room air enters around the dispenser chute. A chute door that does not close completely may allow frost to form and later melt.
Water or slushy ice near the front of the bin may be related to:
- A dispenser flap that is stuck open
- Ice fragments blocking the chute door
- A damaged dispenser seal
- A weak dispenser-door spring or motor
- High humidity entering through an air gap
This condition is different from a leak during the ice maker fill cycle, although both may produce water in or around the ice bin.
Symptoms That Help Identify the Leak Source
The location and timing of the water can provide useful clues.
Water Appears Immediately After the Ice Maker Fills
Inspect the fill tube, fill cup, mold, and water inlet valve. A misaligned tube or overflowing mold is especially likely when the leak follows each fill cycle.
Water Drips Even When the Ice Maker Is Off
A water inlet valve may not be closing completely. Turn off the ice maker and observe the fill tube. Continued dripping should be investigated before the tube freezes.
Water Is Behind or Under the Refrigerator
Inspect the household supply line, shutoff valve, inlet-valve connections, internal tubing, filter housing, and drain pan.
Ice Cubes Are Fused Together
Overfilling, valve seepage, or intermittent melting may be adding water to finished cubes.
A Sheet of Ice Forms on the Freezer Floor
Check for water running down from the ice maker area, but also consider a blocked defrost drain.
Ice Forms Around the Fill Tube
The tube may be restricted, the valve may be dripping, or water pressure may be insufficient for proper valve closure.
Step-by-Step Troubleshooting
-
Protect the floor and disconnect power. Place towels around the refrigerator. Unplug the appliance before removing panels or touching internal components. Keep water away from electrical connections.
-
Turn off the refrigerator water supply. Close the household shutoff valve if water is actively leaking or if the refrigerator must be moved.
-
Identify where the water first appears. Inspect the ice bin, freezer wall, freezer floor, filter area, rear supply line, and floor beneath the appliance. Dry existing water so new moisture is easier to trace.
-
Remove and inspect the ice bin. Look for standing water, fused cubes, unusual frost, or ice directly beneath the ice maker. Confirm that the bin is correctly installed and is not interfering with the ice maker.
-
Inspect the fill tube. Check for ice blockage, mineral deposits, cracks, or misalignment. Do not use a sharp object that could puncture the tube.
-
Check the ice maker position. Confirm that the assembly is securely mounted and reasonably level. Look for a cracked mold, damaged fill cup, or evidence that water has spilled over an edge.
-
Examine the exterior water line. Carefully move the refrigerator only when it is safe to do so. Inspect the supply tube and connections for moisture, cracks, kinks, or abrasion.
-
Inspect the water inlet valve area. With power and water safely disconnected, check the valve and tubing connections for mineral residue or visible moisture. White or green deposits may indicate a slow, long-term leak.
-
Check the water filter. Confirm that the filter is the correct type, fully seated, and not overdue for replacement. Inspect the housing for cracks or moisture.
-
Confirm the refrigerator is level. Use a level across the cabinet and adjust the appliance according to the owner’s manual.
-
Observe a controlled fill cycle. Restore power and water only after panels and connections are safe. Watch the fill area from a safe position. Stop the test immediately if water reaches wiring or electrical components.
-
Schedule service when the cause is uncertain. Contact a qualified appliance technician when testing requires live electrical measurements, cabinet disassembly, door tubing repair, or control-system diagnosis.
When Should You Stop Using the Ice Maker?
Turn off the ice maker and close the refrigerator’s water supply when the leak is active, the source is unknown, or water is near electrical components. Continuing to operate a leaking system can increase ice accumulation and water damage.
Stop troubleshooting and seek professional service when:
- Water has reached wiring, connectors, or controls
- The refrigerator trips a circuit breaker or ground-fault device
- The shutoff valve will not close
- Internal tubing is inaccessible
- The freezer must be extensively disassembled
- The repair procedure requires live-voltage testing
- The refrigerator is under a manufacturer or service warranty
Common Parts That May Need Replacement
Water Inlet Valve
The water inlet valve controls water flow to the ice maker and, on many models, the dispenser. Replacement may be necessary if the valve leaks externally, fails to close, has a damaged solenoid, or contains an internal restriction.
Valves can look similar while having different electrical ratings, flow characteristics, outlet arrangements, and connectors. Match the replacement to the full refrigerator model number.
Ice Maker Assembly
A complete ice maker assembly may include the mold, motor module, heater, ejector, thermostat, shutoff arm, or electronic controls. The included components vary by design.
Assembly replacement may be appropriate when the mold is cracked, the fill cup is damaged, or a control problem causes repeated overfilling. Verify whether the replacement includes mounting hardware, wiring adapters, or a shutoff arm.
Ice Maker Fill Tube
A cracked, deformed, or permanently restricted fill tube may need replacement. Some models use a simple tube, while others incorporate a heater to reduce freezing. The correct configuration depends on the refrigerator design.
Water Supply Tubing
Replace tubing that is cracked, kinked, brittle, abraded, or leaking at a damaged end. Use tubing and fittings approved for potable water and refrigerator service.
Tube Connectors and Fittings
Push-to-connect fittings, compression fittings, clips, and retaining rings can wear or become damaged during service. A fitting should not be reused when it is cracked, distorted, or unable to hold the tube securely.
Water Filter and Filter Housing
A restricted or incorrectly installed filter may affect ice production and water flow. A cracked filter housing or damaged seal can create a direct leak. Use the filter specified for the refrigerator model.
Dispenser Chute Door Components
For leaks related to frost or condensation near the ice dispenser, possible replacement parts include the chute door, seal, spring, solenoid, motor, or door mechanism.
Door Gasket
A torn or distorted freezer gasket allows humid air to enter. This can cause frost, melting, and recurring water around the ice bin. The gasket should seal evenly around the full perimeter of the door.
Before ordering any component, locate the refrigerator model number. It is commonly printed on a label inside the fresh-food compartment, along a cabinet wall, near a crisper drawer, or inside the freezer. Use the complete model designation, including all letters, numbers, suffixes, and revision information.
Repair the Component or Replace the Complete Ice Maker?
The best repair depends on the source of the leak and the way the manufacturer services the unit.
A separate component may be appropriate when the leak clearly comes from an accessible fill tube, water line, fitting, or inlet valve. A complete ice maker assembly may be the better option when the mold, fill cup, internal control, or multiple mechanical components are damaged.
Consider the following before ordering:
- Whether the failed component is sold separately
- The age and condition of the ice maker
- Whether more than one component is worn
- The labor required to reach the part
- Manufacturer service recommendations
- Part compatibility with the exact model
A correct diagnosis is more important than replacing the most visible component. For example, replacing a frozen fill tube without correcting a dripping inlet valve can allow the blockage and leak to return.
Preventative Maintenance Tips
- Inspect the supply line regularly. Look behind the refrigerator for moisture, abrasion, corrosion, or kinks. Replace damaged tubing promptly.
- Replace the water filter as recommended. A neglected filter can restrict flow and reduce ice maker performance.
- Keep the refrigerator level. Recheck leveling after moving the appliance or adjusting the floor.
- Maintain proper freezer temperature. Avoid unnecessarily cold settings that may contribute to freezing near the fill area, and investigate temperatures that are too warm.
- Keep air vents clear. Do not pack food tightly against freezer airflow openings.
- Clean the door gasket. Remove residue that prevents a complete seal and replace a gasket that is torn or permanently distorted.
- Check the ice bin position. Install the bin fully after cleaning and remove large clumps that interfere with the mechanism.
- Use the ice maker regularly. Long periods of inactivity can allow stale ice to clump and may make small leaks less noticeable.
- Turn off the water before extended absences. Follow the refrigerator manufacturer’s storage or vacation instructions.
- Investigate small leaks early. Mineral deposits, isolated frozen droplets, or occasional fused cubes may be early signs of a developing problem.
Frequently Asked Questions
Why is my ice maker leaking water into the ice bin?
Water in the ice bin may result from an overfilling ice maker, a misaligned fill tube, a water inlet valve that does not close completely, or ice that is melting because the freezer is too warm.
Why does my ice maker fill tube keep freezing?
A fill tube may repeatedly freeze when the inlet valve drips after the fill cycle, water pressure is too low, the tube is restricted, or the tube is not positioned correctly. Removing the ice without correcting the cause may provide only temporary relief.
Can a bad water inlet valve cause an ice maker to leak?
Yes. A valve that sticks, seeps, or fails to close completely can allow excess water into the ice maker. It can also contribute to a frozen fill tube, oversized cubes, or ice fused into a solid mass.
Why is there a sheet of ice on the bottom of my freezer?
Water may be running down from the ice maker, but a blocked or frozen defrost drain is another common possibility. Trace the ice upward and inspect both the fill area and the freezer drainage system.
Can low water pressure make an ice maker leak?
Yes. Some refrigerator inlet valves rely on adequate water pressure to close correctly. Low pressure may allow the valve to seep, although the required pressure varies by model.
Why are my ice cubes stuck together?
Cubes may fuse together when the mold overfills, the inlet valve drips, or freezer temperatures fluctuate enough to partially melt the ice. Check for water in the bin and confirm that the freezer door seals properly.
Should I turn off my refrigerator if the ice maker leaks?
Turn off the ice maker and close the water supply first. Unplug the refrigerator when water is near electrical components or when panels must be removed. Food-storage considerations may require transferring perishable items to another cold location.
Can a refrigerator water filter cause an ice maker leak?
An incorrectly installed filter, damaged seal, cracked filter housing, or severe restriction can contribute to leaks or irregular water flow. Inspect the filter area and use the filter specified for the refrigerator model.
How can I tell whether the ice maker or water line is leaking?
Dry the area and observe where new water appears. Water inside the freezer immediately after a fill cycle points toward the fill tube, valve, or ice maker. Water behind the refrigerator is more likely related to the supply line, fittings, or inlet valve connection.
Can an unlevel refrigerator make the ice maker leak?
Yes. If the cabinet or ice maker is significantly out of level, water may spill from the mold or fill cup. Improper leveling can also affect door closure and contribute to frost and condensation.
Is it safe to thaw a frozen ice maker fill tube with a hair dryer?
Using concentrated heat can damage plastic liners, tubing, insulation, and wiring. Follow the manufacturer’s recommended thawing procedure and disconnect power before working near the fill area.
How do I find the correct replacement part for a leaking ice maker?
Locate the complete refrigerator model number and use it to search an appliance-parts catalog. Compare the part description, connections, included components, and any model notes before ordering.
Entities and Terms
- Ice maker assembly
- Ice maker mold
- Fill cup
- Fill tube
- Water inlet valve
- Solenoid
- Refrigerator water line
- Water supply tubing
- Push-to-connect fitting
- Compression fitting
- Water filter
- Water filter housing
- Freezer door gasket
- Dispenser chute door
- Defrost drain
- Ice storage bin
- Household shutoff valve
- OEM replacement parts
Final Thoughts
An ice maker leak is usually caused by a problem with water delivery, alignment, temperature, drainage, or the ice maker assembly itself. The timing and location of the water are often the best diagnostic clues.
Begin with simple observations: inspect the ice bin, look for ice around the fill tube, check the exterior supply line, confirm the filter is installed correctly, and make sure the refrigerator is level. When a part needs replacement, use the complete appliance model number to identify a compatible OEM component.
Turn off the water supply when a leak is active, and do not continue operating the system when water is near electrical wiring. A qualified appliance technician can safely diagnose problems involving live-voltage testing, internal cabinet tubing, controls, or extensive freezer disassembly.
This article was written by an AI program as part of a beta test by Appliance Parts Group to explore how artificial intelligence can help inform and educate our customers.
Our goal is to use AI tools to provide clear, reliable information so you can make confident, well-informed purchasing decisions.